Also, I'm sure there are better/different ways to go about this. throwing down pencils an a blank PSD is a challenge, no matter which way you slice it, because a tablet and pen is far from a pencil and paper... so I guess the important thing is find something that works for you. I learned from a combination of personal experience, professional trainers, and online tutorials and i've pulled heavily from each to get the process I have now (not just pencils but coloring as well).
SO, let's get this party started.
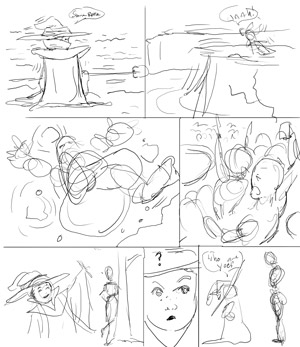
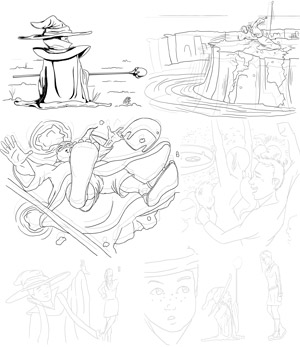
Step 1 - the Storyboard
I. Open up a blank photoshop document. I work entirely at 8"x9.25" and 300 pixels per inch. My laptop isn't exactly a slouch but it starts stuttering a bit if I go much larger than that. The important thing is to start off big and shrink it down later to make the lines look nicer. If you plan on printing the finished work, do not go below 300 ppi.
once my work is finished i shrink it down to 1000px X 1156px because that's what fits the layout of my page the best. But that's getting ahead of myself.
II. Create a new layer and name it Storyboard. On this new layer draw out a hasty sketch to get your layout right. No sense in going for quality here, just do some quick gestures of your characters and block off area where text is going to show up. I use the standard brush at size 5px.
********************************************************
Step 2 - The Sketch
I. Create a new layer and name it "Sketch."
II. Turn down the Opacity of the storyboard layer to a place where it fades out a bit. I usually take it down to about 30%. Viola! Think of your Sketch layer as tracing paper.
III. Flesh out the drawing with a general idea of how things should look. Nail down placement of characters, backgrounds, etc. This still isn't going to be a high quality drawing... just the necessary details to get a solid feel for the panels. Keep that ctrl+z close at hand for quick corrections. Sometimes I'll undo the same line 5 to 10 times, so don't feel bad if you can't seem to get it right. More practice will make you more consistant.
*******************************************************
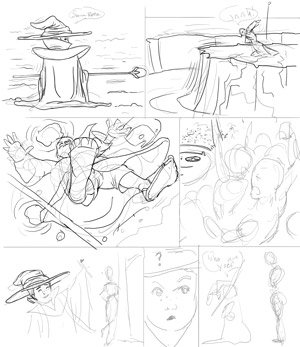
Step 3 - The Individual Panels
I. This is where it gets a little more technical. Hide the storyboard layer and make sure the sketch layer is selected. Drag a marquee rectangle (or lasso tool, whatever's easier) around Panel 1 and hit CTRL+J to float the selection. This will create a new layer with just your selection on it. Name this new layer P1 Rough.
II. Hide the sketch layer. On the P1 Rough layer, hit CTRL+T for free transform. Hold the shift key down (this will keep everything to scale) and enlarge the panel by dragging one of the edges down/up/whatever. I usually get it large enough to where it takes up most of the page. The reason for this, as i mentioned above, is to create your lineart as large as possible and then shrink it down after.
III. You should have a huge version of the first panel of your sketch layer. It's probably a little blurry and gross; that's fine. Lower the P1 Rough layer opacity like you did on the storyboard and then Create a new layer (get used to lots of layers! and keep them organized!). Name it P1 Lines and start tracing over your P1 Rough layer. This is where you want to make sure to add all the fine details and let your work shine. Again, I generally stick with a size 5px hard tip brush, but you may want to go up to 9px if your art style calls for it. The 3px just requires too much pressure for it to really show up well, imo, so I tend to only use it for crosshatching and stuff.
IV. Once you're done with the panel, throw away the P1 Rough layer, unhide the storyboard layer, and resize/shrink the P1 Lines layer to fit it where you want it on the page (remember CTRL+T and then hold shift to keep it to scale...also, you can drag/drop a Free Transform selection with the mouse just like you're playing solitare! To nudge a selection one pixel at a time, use the arrow keys)
As Borat says: Great Success!
*******************************************************
Step 4 - Rinse and Repeat
I. Follow the same process for each of your panels.
II. If you have a panel that spans the entire page width, you may choose to just do the line art at the same size as the sketch layer. Don't forget, you can also break a wide panel into 2 halves just for the sake of creating the lines.
*******************************************************
That's it for this one.
If there is just one piece of advice I could give to a Photoshop neophyte it would be LEARN THE SHORTCUT KEYS! You have no idea how many seconds I save here and there by holding the spacebar down to scroll, let alone the transform, save, zoom in and out, brush/eraser/gradient/etc...
"Seconds?" you think to yourself. "Posh, James! POSH I say!"
Seriously. Those thousands of seconds I save translate into a LOT of time.
My advice is this. If you don't know the hotkey for a command, look it up and use it. Even if that means hovering the mouse over the brush button to figure out it is "b", do that and then hit "b" on the keyboard instead of clicking it with the mouse. Repeat that process as many times as you need to get it in your noggin. Takes a little extra time now, but it will make things so much better for you in the long run! Within a few days you'll be zipping around photoshop fast enough to make everyone elses' head spin.
If anyone has a tutorial request please let me know. I do consider myself an advanced Photoshop user (and I'm sure i'm not the only one on this forum).

